There is a distinct moment of satisfaction when you finally lift a television off a cluttered media console and secure it to the wall. Suddenly, the room feels larger, the sightlines are cleaner, and your TV stops looking like an appliance and starts looking like a piece of intentional design. But before you reach for the power drill, you have to navigate a sea of metal brackets and technical specifications.
Choosing a TV mount isn't just about finding something that "fits." It is about balancing the structural integrity of your home with the ergonomics of how you actually live. Think of this process as building a foundation; if the foundation is solid and well-planned, the rest of the experience is seamless. If it’s rushed, you’ll end up with a crooked screen, neck strain, or, worst case, a very expensive sound of crashing plastic in the middle of the night. This step-by-step buying guide is here to ensure that doesn’t happen.
Step 1: Know Your TV Inside and Out
Before you even look at a mount, you need to interview your television. You might know the screen size is 65 inches, but that is the least important number in this process. To choose the right hardware, you need the technical DNA of your device.
Finding the VESA Pattern (The Magic Numbers)
If you look at the back of your TV, you’ll see four threaded screw holes arranged in a square or rectangle. This is the VESA (Video Electronics Standards Association) pattern. This universal standard ensures that a mounting bracket made by one company will fit a TV made by another.
To find your VESA size, measure the distance between these holes in millimetres, starting with the horizontal distance and then the vertical. For example, if the holes are 400mm apart horizontally and 400mm vertically, you have a 400x400 VESA pattern. Most mount packaging or your local retailer will list the VESA patterns they support. Never guess here. If your TV has a 600x400 pattern and you buy a mount that only goes up to 400x400, no amount of "making it work" will bridge that gap safely.
Weight and Size
Modern TVs are thinner than ever, but they still carry significant weight, especially when you factor in the leverage they exert on a mount. Every mount has a maximum weight capacity, and this is a hard limit, not a suggestion.
When checking your TV’s weight, make sure you are looking at the "weight without stand" specification. You should aim for a mount that can handle at least 20% more than your TV’s weight. This "safety buffer" accounts for any accidental bumps or the weight of a soundbar you might attach later. Similarly, pay attention to the recommended screen size range. A mount might be strong enough to hold a 75-inch TV, but the bracket itself might be too small to provide the stability required for such a wide frame.
Step 2: Understand the Three Main Types of Mounts
Not all mounts serve the same purpose. Choosing between them depends entirely on your room’s layout and where you plan to sit.
Fixed Mounts
The fixed mount is the "set it and forget it" option. It holds the TV as close to the wall as possible, often within an inch. This creates a sleek, "picture frame" look that is unbeatable for modern aesthetics.
However, fixed mounts are the least forgiving. Once it’s up, you can’t tilt it to avoid glare or turn it to face the kitchen. You also need to be certain about your height placement from the start. Use fixed TV wall mounts only if you can place the TV at perfect eye level, and you have total control over the lighting in your room.
Tilting Mounts
If you’ve ever sat in a living room where the TV is mounted above a fireplace, you know the struggle of "the crane", that uncomfortable upward tilt of the neck. A tilting mount solves this by allowing the TV to angle downward, usually between 5 and 15 degrees.
Tilting mounts are the heroes of bedrooms and high-wall installations. By angling the TV screen toward your eyes, you maintain a better viewing angle for colour accuracy and contrast, which degrades when you view an LCD screen from an off-angle. They are also fantastic for rooms with large windows; a slight tilt can often move a reflection of the afternoon sun right off the screen.
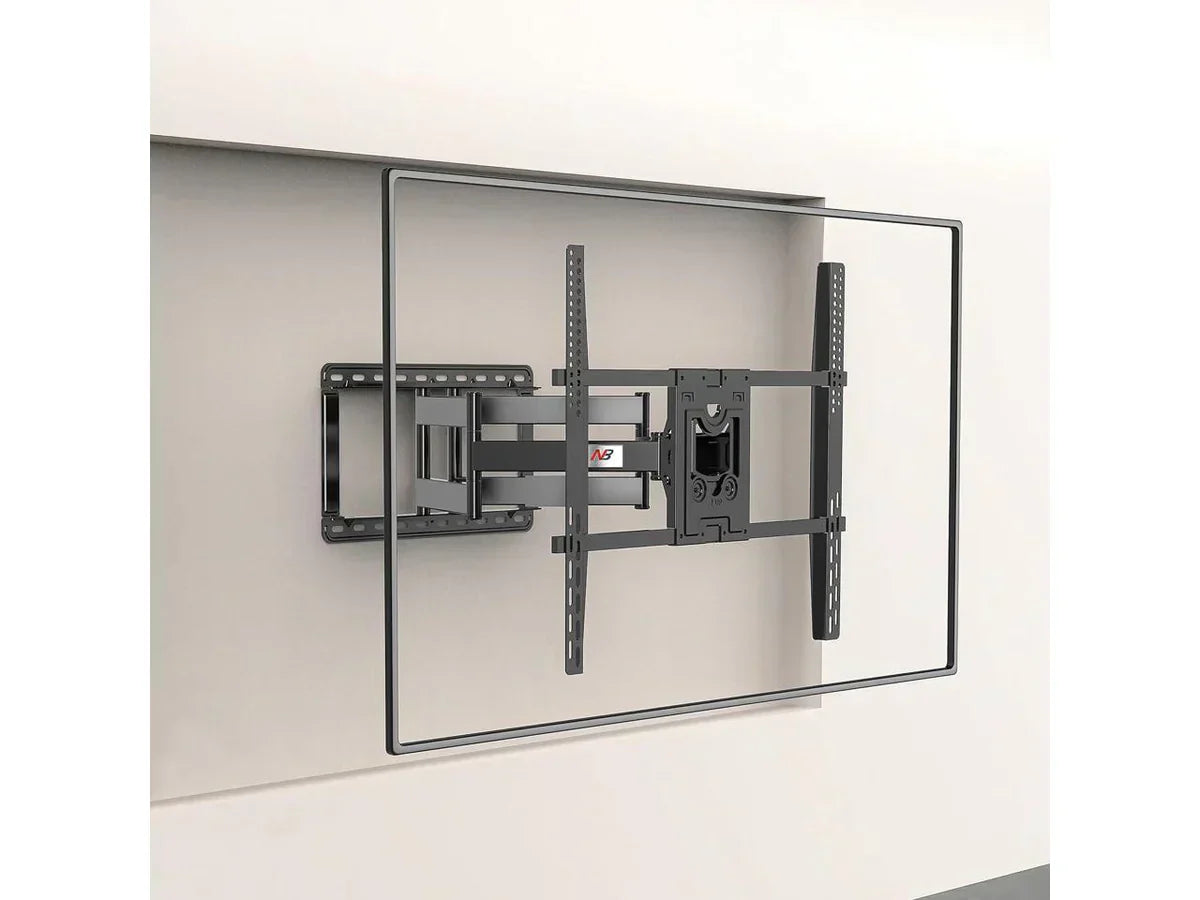
Full-Motion (Articulating) Mounts
Full-motion mounts use an extendable arm to pull the TV away from the wall, allowing it to swivel left and right or tilt up and down. This is the Swiss Army knife of mounting solutions.
These are ideal for "great rooms" where you might want to watch the news from the dinner table and then swivel the TV toward the sofa for a movie. They are also perfect for corner installations where a flat mount simply won’t work. The trade-off for this increased functionality is complexity; because the arm adds leverage, these mounts require a very secure attachment to the wall studs, and they usually sit further out from the wall when collapsed than fixed or tilting models.
Step 3: Analyse Your Wall and Living Space
You can have the best mount in the world, but it’s only as strong as the wall it’s attached to. Understanding your home’s anatomy is the most critical safety step.
Studs vs. Drywall
Never, under any circumstances, hang a TV on just plasterboard using plastic anchors. Plasterboard is essentially chalk sandwiched between paper; it is not designed to hold 23 kilograms of vibrating electronics.
Your mount’s wall plate is designed to span this gap and be bolted directly into the centre of these studs using lag bolts. Use a high-quality stud finder to mark the edges of the studs, then find the centre. If your mount doesn’t align perfectly with your studs, look for a mount with a wider wall plate that allows for "lateral shift," letting you slide the TV left or right after it's bolted down.
The Eye-Level Rule
The most common mistake in home theatre setup is mounting the TV too high. We see TVs high on the wall in sports bars and airports because people are standing or sitting far away, but in a home, this leads to chronic neck fatigue.
The "Eye-Level Rule" is simple: for comfortable viewing when you are sitting in your primary viewing position, your eyes should be level with the bottom third of the screen. If you find yourself looking up, the TV is too high. Before you drill, have someone hold a piece of cardboard the size of your TV against the wall while you sit on the couch. If it feels like you're in the front row of a movie theatre, move it down.
Dealing with Specialty Surfaces
If you are mounting on masonry, the rules change. You won't be looking for studs; instead, you’ll be using a hammer drill and masonry anchors. Brick and concrete provide incredible support, but they are unforgiving. You must ensure you aren't drilling into the mortar (which is crumbly and weak) but rather into the solid centre of the brick or stone. If you have a stone fireplace with an uneven surface, you may need a specialised mount or spacers to create a flat mounting plane.
Step 4: Consider the Practical Extras
Once the TV is on the wall, the "little things" become the "big things."
Cable Management
Nothing ruins the look of a wall-mounted TV faster than a messy bundle of cables hanging down the wall. In Australian homes, you generally have two safe and common approaches: surface-mounted (on-wall) or concealed (in-wall for low-voltage only).
In-wall cable routing (concealed look)
In Australia, cables can be run inside plasterboard wall cavities, but this must be done carefully and in line with AS/NZS electrical safety principles.
-
Only run low-voltage cables (HDMI, optical, antenna) inside walls
-
Use LSZH (low smoke zero halogen) or in-wall rated AV cables where possible
-
Ensure cables are suitable for concealed installation and do not have damaged insulation
-
Keep cable access points compliant and avoid sharp bends or crushing inside the wall cavity
Post-Installation Levelling
Even carefully installed brackets can end up slightly off because most walls are not perfectly straight.
Many quality TV mounts sold in Australia include post-installation levelling adjustment, which uses small screws on the mounting arms to:
-
Fine-tune the TV’s horizontal alignment
-
Correct slight tilt after installation
-
Achieve a professional, level finish even if the wall surface isn’t perfect
This is especially useful in older homes where plasterboard or brick walls may not be perfectly square.
Security and Safety Features
For homes with children, pets, or higher safety requirements, consider mounts with locking or retention systems.
Common features include:
-
Spring-loaded “click-in” locking mechanisms
-
Security screws that prevent accidental removal
-
Secondary safety latches on full-motion arms
These systems help prevent the TV from being accidentally lifted off the bracket or knocked loose, especially in busy living areas.
Step 5: The Pre-Purchase Checklist
Before you hit "buy" or head to the checkout counter, run through this final mental walk-through to ensure no surprises during installation.
Verify Your Screen Clearance and Rotation Needs
If you are buying a full-motion mount for a large TV (75 inches or larger), check the "arm extension" length. If the arm is only 15 inches long, a 75-inch TV won't be able to turn a full 90 degrees before the edge of the screen hits the wall. If you need a significant swivel angle, ensure the arm length is at least half the width of your TV.
Check the Ports: Will the Mount Block Your Cables?
This is a frequently overlooked detail. Look at the back of your TV. Are the HDMI, power, and optical ports located in the centre, right where the mounting plate will sit? If your TV’s ports face straight out (instead of to the side), a low-profile fixed mount might crush your cables. In these cases, you’ll either need a mount with built-in spacers or "90-degree" HDMI adapters to give your cables room to breathe.
Conclusion: Ready to Drill With Confidence
Choosing the right TV mount is the bridge between owning a gadget and creating an environment. By taking the time to measure your VESA pattern, understanding the limitations of your wall, and being honest about your viewing habits, you turn a potentially stressful DIY project into a guaranteed success.
Remember, the goal isn't just to get the TV on the wall; it’s to place it exactly where it enhances your life. Once you’ve verified your studs, cleared your ports, and accounted for the "eye-level rule," you can pick up that drill with total confidence. Your masterpiece is only a few bolts away.
Ready to mount your TV with confidence? Explore reliable fixed, tilting and full-motion TV wall mounts at Screen Mounts Australia and find the right fit for your space today.
Share:
How Much Weight Can a TV Stand Hold?
TV Stand vs Wall Mount: Pros, Cons & How to Choose